
Tools : Adobe Photoshop CS4 (I swear you are going to use this, a lot); Camstudio (to cut video)
* This tutorial is for those who already have basic knowledge about Photoshop? wait... er... can I say intermediate user? :p
As per request,

But I am not going to explain what is *gif because I know little or nothing about that. What I know is the image is moving. Yeah... moving like sooo ~ahahaha... general knowledge~.
This entry is created just to show you how to make *gif from imported video... er... not exactly ripping the content from the whole video. Just take certain part that you want to turn into *gif.
First thing first, cut the video using any software that you familiar with. As for me, I use camstudio ~the audio sucks. Wait! gif has no audio involved~.

Save the file. At least you know that's the file you want to work on with.
OPEN PHOTOSHOP APPLICATION
Open the ANIMATION PANEL first. If you don't have any idea, look at the picture below.

*click image to enlarge
IMPORT VIDEO
Just make sure you know which file/video you want to work with.
Go to FILE --> IMPORT --> VIDEO FRAMES TO LAYER
Notes:
- The video shouldn't be too long or else the the photoshop will automatically delete the last part.
- Make sure the format is in *mov/*avi/*mpg/*mpeg

*click image to enlarge
xXxXxXxXxXx
As for this part, you have three options. After selecting one option, hit "OK".
If the video is kinda short, you can just select the "FROM BEGINNING TO END".
If youwant to select certain range of the video, then choose the "SELECTED RANGE ONLY"
1. Put your cursor over the slider and drag it to a certain part. That's where you STARTING POINT is.
2. Hold SHIFT key and drag the slider to the right where you want it to end. That's your ENDING POINT.
3. In between is the selected part of the video you will import into the platform.
If the video is kinda long, and you just not sure what to do with it, you can choose the last option; "LIMIT TO EVERY [insert amount of] FRAMES" ~I rarely tick this option, unless the part that I cut is long and I don't cut any~

*click image to enlarge
Once you imported the video, you can see there are two panels with lot of images. One in the LAYERS PANELS and the other one in the ANIMATION (FRAMES) PANEL.
Make sure you focus on the ANIMATION (FRAMES) PANEL below the platform.
Now the video is divided into frames. You may click on each frame to understand better. ~meh! too hard to explain, I don't know how to put in words.

*click image to enlarge
If you notice, each of the frame has time. I think you know what's the purpose, no need to explain, no? So, play around with it for a while. ~For each frame, 0.2 second is better. But if you have text, you either duplicate the frame two or three times or extend the time for about 0.5 second~

*click image to enlarge
EDITING IMAGE/FRAME
Delete frames that you don't want to appear in your *gif by selecting the frame and hit the RUBBISH icon at the bottom of the panel.
Hit "YES" to discard the unwanted frames.

*click image to enlarge
NOTES:The image in the ANIMATION PANEL is like a shortcut of the original image in the LAYERS PANEL.
If you delete an image/frame in the ANIMATION PANEL, the image is still exist in the LAYERS PANEL.
But, if you delete the image in the LAYERS PANEL, the image is no longer exist in the file.
To simplify, just assume LAYERS PANEL is where your original file is. The ANIMATION PANEL is just a shortcut to that file. ~easy enough?~
SAVING FILE
Saving *gif file is not the same as saving other image file. You are not going to use the "SAVE" or "SAVE AS" options.
But rather, publishing the image... er... sorta ~ugh! that's what I understand. Have no f*ckin' idea~
REMEMBER! REMEMBER! and ALWAYS REMEMBER! to select the SAVE FOR WEB AND DEVICES ~please don't ask me why~.

*click image to enlarge
If you want your *gif keeps playing the whole time, just choose "FOREVER" in the LOOPING OPTIONS.
Also, you may ignore the IMAGE SIZE because photoshop normally using the original size.
Just in case you want to publish in a web which allows certain size, you can just adjust the size in that option.
When you click the "SAVE" button, another new windows will pop up. Picture below.
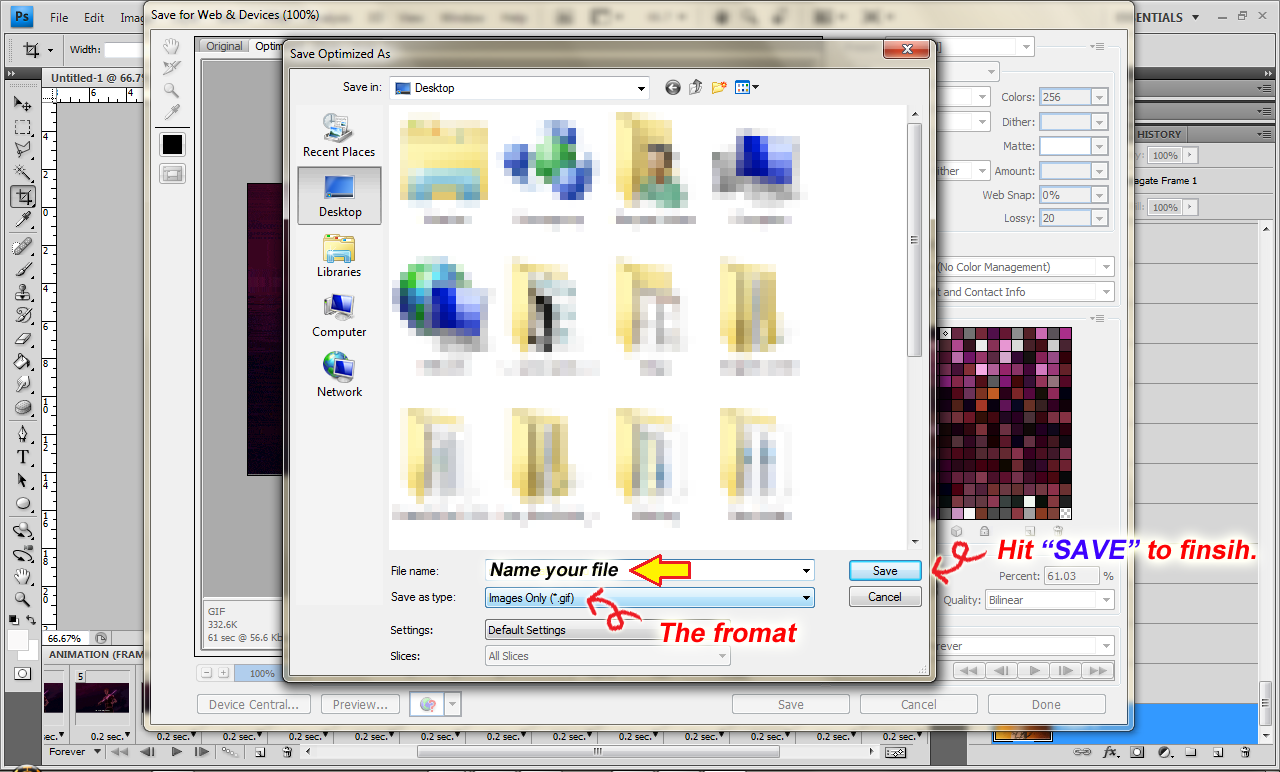
*click image to enlarge
And so, the final product...
Gintama 276


If I'm not mistaken, there are some software which we can save trimmed part in .gif file. maybe
ReplyDeleteyup... several, but since I can DIY, then I use photoshop
DeleteThank you. These are so simple. By the way, this is not for basic user :)
ReplyDeleteGreetings, RandomReader.
You're welcome RandomReader
Deleteok.. got it..!! patutla x jumpa window > animation tu, sbb saya guna CS6. kalau cs6, time frame tu mmg sedia ada kat bawah tu.. :)
ReplyDeletesenangla klu camgitu... tp sy belum tengok cs6 lagi... mungkin dah banyak function dia tambah kat cs6.
DeleteWow... using photoshop? That's a difficult and powerful tool. Not everyone can master it like you do. You are so cool! Your tutorial is very helpful and easy too. Just a suggestion, what about trying GIMP? It's easier than photoshop. It's just that photoshop is superior than GIMP. You can give it a try :)
ReplyDeleteHah thanks. But, once you know how photoshop works, I don't think you'll have trouble. About the suggestion, I'm not sure if I can master GIMP, but I'll have a look at that program anyway. :)
DeleteHi. I am also using photoshop cs4, when I import video, I got a message saying, "Could not complete the video frames to layers command because quick time version 7.1 or later is required". Do I need to update it to the latest photoshop?
ReplyDeleteno.. no.. Just update quick time. That is the one that you need. The photoshop is fine the way it is. :)
Delete